A Contact Form 7 redirect sends visitors to a page you choose after a successful submission, which is what makes conversion tracking possible. Below are two ways to set up a Contact Form 7 redirect, including the modern one.
Note that on_sent_ok was deprecated in Contact Form 7 5.0. Therefore, prefer the event-listener method for anything new. See the extension docs if you also sync submissions.
Redirect After Submitting the Form
You can set Contact Form 7 to redirect to any page after the form was successfully submitted.
– First, copy the code below:
on_sent_ok: "location = 'https://example.com/thank-you';"
– Then paste the code inside the ‘Additional Settings’ tab and edit it to reflect your current setup:
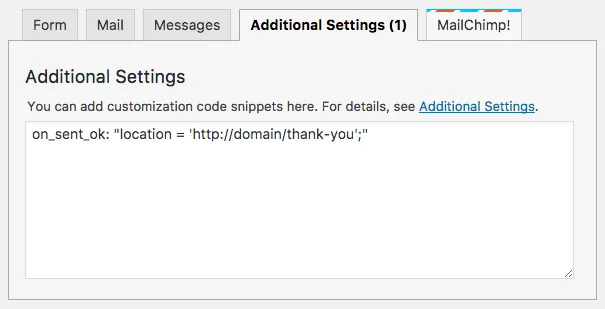
This is a quick and easy way to setup redirects for Contact Form 7. Let me Know if you have any questions regarding this setup.
Do you need help setting up Contact Form 7 MailChimp Extension?
The modern method
Contact Form 7 removed on_sent_ok in version 5.0, so the snippet above only works on very old installs. Instead, listen for the event the plugin fires on a successful submission and redirect from there. Add this to your theme, or to a small site plugin:
document.addEventListener( 'wpcf7mailsent', function( event ) {
    location = 'https://example.com/thank-you/';
}, false );
The event carries event.detail.contactFormId, so one listener can route several forms to different destinations rather than sending everyone to the same page.
Why redirect at all
A dedicated thank-you page gives you a URL to fire conversion tracking on. An inline success message does not, because the page never changes. Consequently, if you are measuring form conversions in analytics or ads, the redirect is what makes the goal countable.
The official Contact Form 7 DOM events reference lists every event you can hook, including the failure cases worth handling.